Build the brand system around one approved product
Private label is more than placing a logo. It links the selected board configuration to artwork, packaging, instructions, product imagery, quantity assumptions, and a documented approval path.
1. Freeze the base product before branding it
Choose the board, base, controls, marker set, accessories, and pack structure before artwork starts, so brand files are created for a stable physical configuration.
Private-label discussions often begin with colors and logos, but the first decision is the product beneath the brand. Identify the exact shaped panel, drawing area, base, illumination modes, input arrangement, marker assortment, cleaning item, printed materials, and inner support. Request current photographs and a component list tied to the supplier's reference. If alternatives remain under consideration, give each a separate working code instead of mixing features into one undefined sample.
Document what is standard, what can be selected from existing options, and what would require new development. This distinction affects sample work, artwork dimensions, quotation structure, and the questions behind minimum order quantities. It also protects the buyer from approving a beautiful box that depicts a different base, marker count, or light control from the product eventually packed inside.
A practical freeze sheet should show the chosen panel and base together, then list every item that travels in the retail pack. Measure the artwork-bearing surfaces on the physical sample rather than borrowing dimensions from a similar catalogue model. Check whether the marker colors shown on the proposed carton are the colors actually supplied, whether the cleaning cloth has a defined packing position, and whether the photographed power accessory belongs to the destination version under review. If the buyer later changes the shape or base color, reopen the affected artwork, insert, photography, and carton checks instead of treating the change as cosmetic. This product-first sequence gives designers a reliable canvas and prevents a branded presentation from hiding an unresolved component choice.
- Assign a working code to each product and packaging variant.
- Separate existing options from new structural or functional development.
- Confirm the complete set before producing final artwork dimensions.
- Retain product photos that clearly identify the selected configuration.
2. Map every brand and information touchpoint
A touchpoint map states where the logo, product name, colors, instructions, identifiers, and buyer-supplied claims appear across product, package, inserts, cartons, and digital assets.
Create a matrix for product marking, base decoration, retail box panels, labels, instructions, inserts, carton marks, barcode space, and marketplace imagery. For every item, name the source file, owner, language, placement, color reference, and approval status. Distinguish mandatory buyer content from supplier placeholders. When a statement requires destination-specific or legal review, assign it to the buyer's qualified process rather than asking a graphic designer or factory contact to interpret it.
Supply vector logos, fonts or approved substitutions, color references, and a simple hierarchy for the brand and product name. Include clear-space expectations and rules for monochrome use if relevant. Do not rely on screenshots as master artwork. A disciplined asset package allows the factory or packaging designer to prepare an accurate layout and gives the buyer a clear basis for checking whether the right brand version has been applied.
Walk through the pack from the customer's viewpoint and mark every place where identity can conflict: the logo on the base, product name on the front panel, variant image on a side panel, barcode label, instruction heading, importer details supplied by the buyer, and master-carton reference. Give each touchpoint its own line in the artwork register even when several use the same logo file. The register should also state whether a factory-applied mark is printed, labelled, or molded, because the approval evidence differs. A product photograph can approve position and scale for one method, while a print proof is needed to review copy, color separation, and image assignment. This granular map catches quiet mismatches such as a cloud-shaped board inside a box whose side panel still names the star variant.
| Touchpoint | Controlled input | Approval evidence |
|---|---|---|
| Product or base | Mark, size, position, color, and method | Drawing or physical sample view |
| Retail carton | Panel layout, copy, imagery, identifiers, languages | Numbered artwork PDF |
| Insert or instructions | Product-specific content and revision owner | Reviewed final file |
| Digital listing | Current product, package, contents, and brand assets | Channel-ready approved folder |

3. Use separate product, artwork, and packed-sample gates
Private-label approval is safer when the physical product, printed artwork, and complete packed set are reviewed as connected but distinct gates.
The product sample gate confirms the selected panel, base, light controls, marker set, accessories, and visible workmanship direction. The artwork gate checks layout, images, brand assets, copy, variants, languages, and identifiers against numbered files. The packed-sample gate brings those decisions together in the intended insert and retail carton. A digital rendering can support layout review, but it cannot show how the actual components fit, move, or appear when opened.
Write acceptance notes for every gate and prohibit silent substitutions. If the buyer accepts a conditional sample, identify the exact change, evidence required, and person authorized to close it. Photographs should show the sample identifier and current artwork revision. This process avoids the ambiguous phrase 'sample approved' when stakeholders approved different aspects at different times or when a later packaging change altered the physical presentation.
Treat the three sample gates as different questions with different reviewers. A product buyer can accept the board geometry while a brand manager still rejects the logo scale; a packaging reviewer can approve the dieline while the complete set still shifts inside the insert. Record decisions in separate sections of the approval log and show the sample code in every photograph. For the packed-sample review, open and repack the set in sequence, confirm that printed imagery matches the enclosed variant, and photograph the component positions before and after normal handling. When a correction is requested, name which gate it reopens. A new marker assortment, for example, may require another contents image and insert check without invalidating the already accepted acrylic outline.
- Approve product configuration before final branded photography.
- Approve numbered artwork files rather than email attachments with generic names.
- Review a complete packed sample with current components and artwork direction.
- Close conditional approvals with traceable evidence before production release.
4. Ask what drives MOQ instead of requesting one unexplained number
Minimum order questions should be separated by product, color, print process, packaging structure, component procurement, and order mix because each decision can have a different constraint.
Ask the supplier to explain the quantity basis for the existing product configuration and then identify how each branding choice changes it. A logo on an existing area may follow a different production constraint from a custom-colored base, new panel shape, printed retail carton, special insert, unique marker assortment, or multi-language insert. Request the assumptions in writing. Do not publish or internally treat a preliminary quantity as a commitment until the selected scope and quotation revision are aligned.
For a range with several shapes, ask whether quantities are evaluated per design, per color, per artwork version, or across a combined order. Record what can be shared and what remains variant-specific. Then build planning scenarios for the buyer's channel rather than pushing every idea into the first order. A focused initial assortment can simplify artwork, photography, inspection references, spare assets, and replenishment decisions even when the supplier offers many visible options.
Translate the supplier's quantity explanation into an assortment worksheet with rows for shape, base color, artwork language, carton size, insert, and product marking method. This reveals which choices create separate production or print batches and which can genuinely be combined. Model a focused launch set and a broader follow-on set using the same worksheet, then note the assets and inspections each additional variant requires. The exercise is not an attempt to predict a final commercial offer before quotation; it is a way to see whether a decorative option creates a second artwork family, another packed sample, and a separate replenishment code. Buyers can then keep the custom touches that make the private-label proposition recognizable and defer variations that add operational work without a clear retail role.
| Customization decision | MOQ clarification |
|---|---|
| Existing shape with brand mark | Which process and quantity basis apply to that mark? |
| Custom base or panel color | Is the quantity assessed per color and product reference? |
| Printed retail carton | Is the print run per artwork, size, or combined family? |
| New structure or tooling | Which development and production conditions are separate from standard supply? |
5. Establish artwork and change control before production
One artwork register, one approval channel, and one production release index reduce the risk of printing an obsolete product image, language, barcode, or variant reference.
Use filenames that include product reference, component, language or market, revision, and status. Maintain a register that links each live file to the physical variant and notes who approved it. Retire superseded versions from the active handoff folder. If feedback arrives as marked screenshots, transfer every accepted change into the master file and issue a new revision; the screenshot is review evidence, not the production source.
Before release, conduct a cross-check among packaging artwork, approved product sample, set-contents list, instruction copy, carton information, and digital product imagery. Verify that colors and proportions are not being judged solely from uncalibrated screens. Any destination-specific statement should have a documented owner. A final file index sent with the purchase documentation gives the supplier and buyer one common answer when several earlier versions remain in email history.
Before print release, conduct a page-by-page reconciliation using the production PDF, not thumbnails in a message thread. Compare the hero image with the approved shape and base, compare every contents callout with the bill of materials, verify the language and buyer-supplied identifiers, and trace the barcode number to the correct variant. Place the approved PDF and its source-file package in a read-only release folder while working files remain elsewhere. If the printer returns a proof with technical adjustments, log those changes as a new proof revision rather than overwriting the buyer-approved file. This makes the final instruction unambiguous: production receives a named file set, purchasing references that set in the order, and inspection can later compare physical print with the same numbered evidence.
- Use revision-based filenames and a single active production folder.
- Link every artwork file to its product, variant, and language.
- Transfer approved annotations into the master file before release.
- Cross-check product imagery and contents against the packed configuration.
6. Build retailer assets from the approved branded set
Product photography, set-contents images, listing copy, pack dimensions, and retailer files should be created from the current private-label sample rather than an earlier generic model.
Prepare a shot list that answers commercial questions: what the shaped board looks like unlit, how the drawing appears illuminated, what is included, how controls are presented, what the branded package looks like, and how variants differ. Clearly label illustrative lifestyle imagery. Product shots should match the approved base, markers, cable or power component, packaging, and brand application. Retain high-resolution masters and create crops intentionally for each channel.
Provide retailers with a concise asset index, reviewed factual copy, product and carton information, and the current artwork-derived identifiers. Avoid claims that the available documentation does not support. Plan how asset changes will be distributed if the product or pack is revised after launch. Private label feels coherent when the physical item, package, instructions, listing, and sales materials all tell the same accurate story, not simply when they use the same logo.
Build the retailer handover around questions a remote buyer or merchandiser will need to answer without holding the sample. Include a front product image in both lit and unlit states, a scaled or dimensioned view, a clearly labelled contents flat lay, close views of controls and base marking, the closed retail pack, and one image showing how the set is arranged inside. Name every file with the product and variant code, then provide a simple usage list for catalogue, marketplace, and sales presentations. Lifestyle scenes should be labelled as illustrative when they do not show the exact production set. Keeping the original masters beside the approved factual copy allows later crops or translations without introducing a different board shape, accessory count, or obsolete package into the launch library.
- Photograph the actual approved branded product and complete set.
- Create clear product, lit-effect, contents, detail, packaging, and variant views.
- Supply reviewed copy and identifiers through one retailer asset index.
- Maintain an update path for revised product or packaging information.
Frequently asked questions
What is private label for an LED fluorescent board?
Private label usually starts with a defined supplier product and applies the buyer's brand and approved presentation across selected touchpoints. The exact scope can include product marking, retail packaging, inserts, instructions, and listing assets, and should be written before quotation and approval.
What should be approved before private-label production?
Approve the physical configuration, component list, brand assets, numbered artwork files, printed materials, packed-set arrangement, and release index. Conditional approvals should identify the remaining change, its owner, and the evidence required for closure.
How should buyers discuss MOQ?
Ask for the quantity basis by product, shape, color, branding process, packaging artwork, insert, and new development. For multi-variant ranges, clarify what can be combined and what is assessed separately. Treat early answers as scope-dependent until the quotation is finalized.
Why is a packed sample important?
It shows the real product, components, insert, artwork direction, and unboxing sequence together. It can expose mismatch, movement, contact, missing accessories, or outdated imagery that separate product samples and flat artwork proofs may not reveal.
Image planning for this topic
These notes document the role and intended context of the two visuals used in this guide.
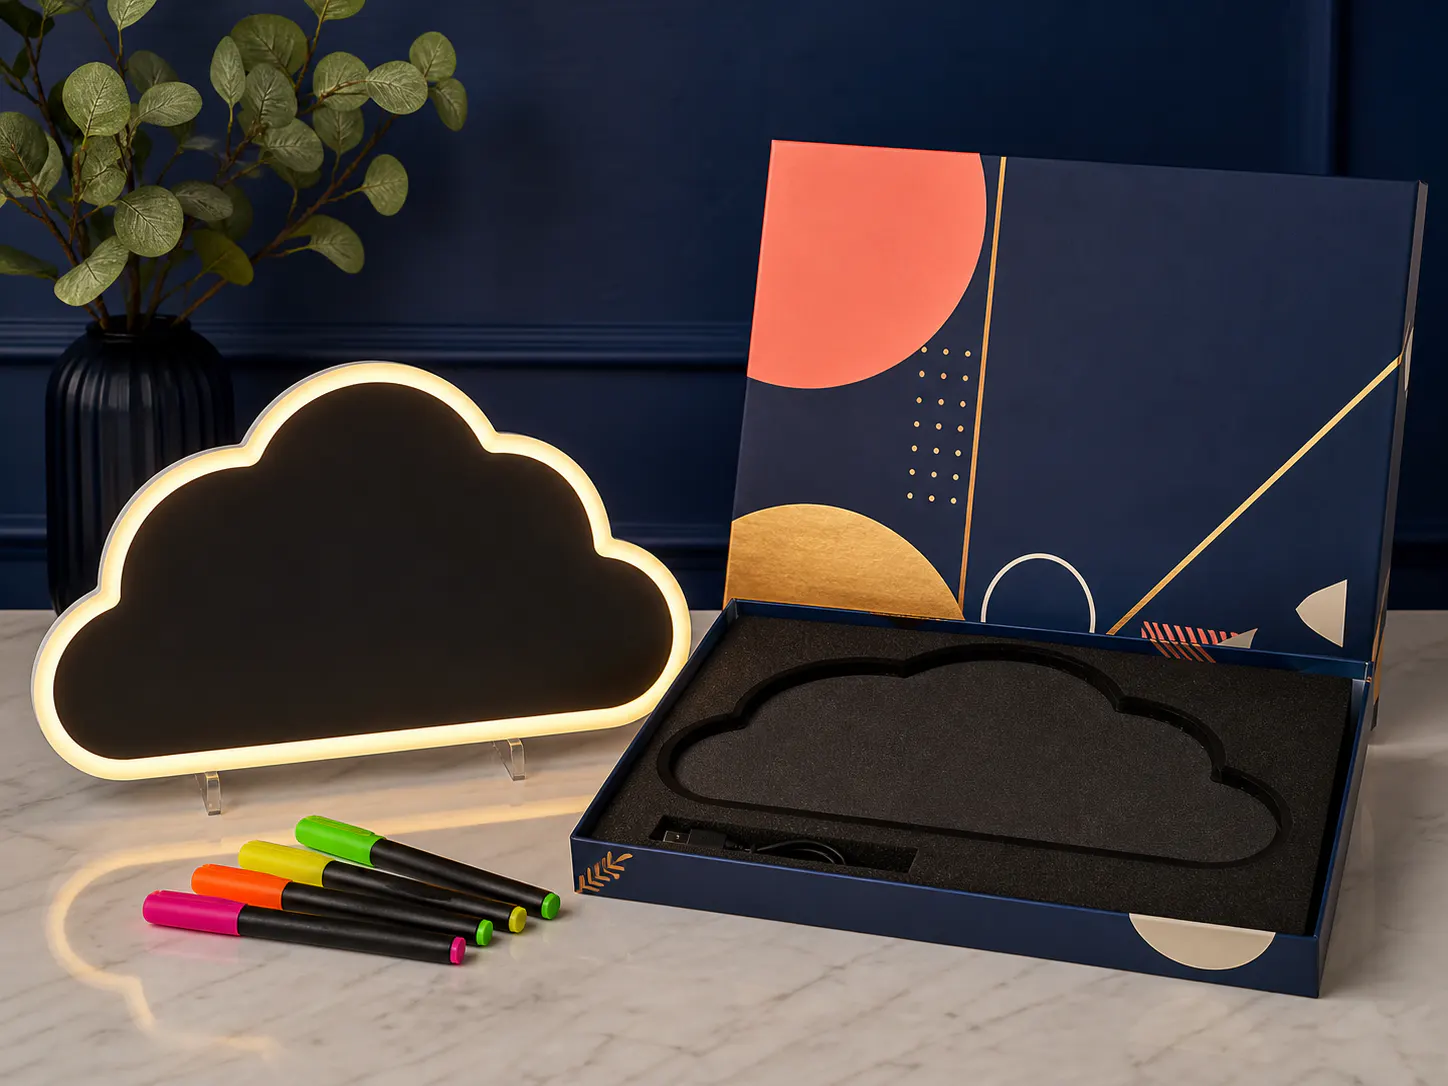
Show a coordinated private-label product and packaging presentation.
- Placement
- hero
- Caption
- Private-label LED fluorescent board concept with coordinated retail packaging.
- ALT text
- Private-label shaped LED fluorescent board beside branded retail packaging
View AI image direction
Premium B2B product photograph of a shaped acrylic LED fluorescent drawing board, matching base, fluorescent markers, instruction insert, and coordinated private-label retail carton on a clean studio table, understated LumDigi branding used as a trustworthy sample brand, no competitor marks, accurate print and acrylic textures, clear version labels, refined blue and warm neutral palette, landscape editorial composition.
Illustrate packed-sample and artwork version checks in production.
- Placement
- after-key-considerations
- Caption
- Packed samples connect approved artwork with the actual product set.
- ALT text
- Chinese factory workers reviewing branded LED board packaging
View AI image direction
Realistic high-detail photograph inside a Chinese packaging line for LED fluorescent drawing boards, ten to twelve Chinese workers organizing shaped acrylic boards, marker sets, inserts, and retail cartons, two supervisors comparing a numbered artwork proof with a packed sample, understated LumDigi badges on uniforms and carton sample, natural factory light, documentary composition, credible worktables and materials, no competitor branding or staged celebration.
Turn the article into a practical sourcing brief
Use the checkpoints above to document the product, evidence, packaging, and approval decisions relevant to your market. A clear brief helps suppliers respond to the same commercial question and gives your team a traceable basis for the next step.
Useful external references
- GS1 Product Image Standard
Primary guidance for consistent product-image identification and digital assets.
- CPSC business and manufacturing resources
Official U.S. business resource; destination-specific obligations need suitable qualified review.
OEM vs ODM vs Private Label for LED Drawing Boards
Choose a customization model by matching desired differentiation and control with realistic development work, evidence, approval ownership, and commercial uncertainty.
Read article
Gift-Ready LED Drawing Boards: Packaging and Seasonal Planning
Create a gift proposition that protects the acrylic set, communicates the occasion, and remains controllable through artwork, packing, shipment, and seasonal change.
Read articleLED Drawing Board Artwork Approval Checklist for Private-Label Buyers
A practical B2B guide for private-label buyers, brand managers, and packaging reviewers who need to review logo use, product graphics, packaging files, variant identity, and production proofs without allowing visual changes to hide configuration mistakes.
Read article
LED Drawing Board Colour and Finish Approval Guide
A practical LumDigi guide for private-label buyers and product managers who need to approve colour and finish from a named physical configuration, sample record, image set, and packing proof.
Read article